As discussed, with PIM, rather than assigning roles to users that are always active, you instead make users eligible to use a role. Users then activate the roles as required.
Important note
This is not the same as just-in-time virtual machine access, which allows access to virtual machines on a per request basis by opening firewalls as required.
For the following walk-through, that demonstrates using just-in-time elevated access, I have created a user called ITManager, which I will use to demonstrate the process. You also need a P1 or P2 license and PIM activated.
Assigning an eligible role
- Navigate to the Azure portal by opening https://portal.azure.com.
- Select or search for Azure Active Directory.
- In the left-hand menu, click Roles and administrators.
- Select the role you wish to assign, for example, User administrator.
- On the left-hand menu, click Role Settings.
- Click Edit at the top.
- Set the activation settings, such as changing the duration to 1 hour and tick Require approval to activate, then add your admin user as an approver. See Figure 4.9, for example:
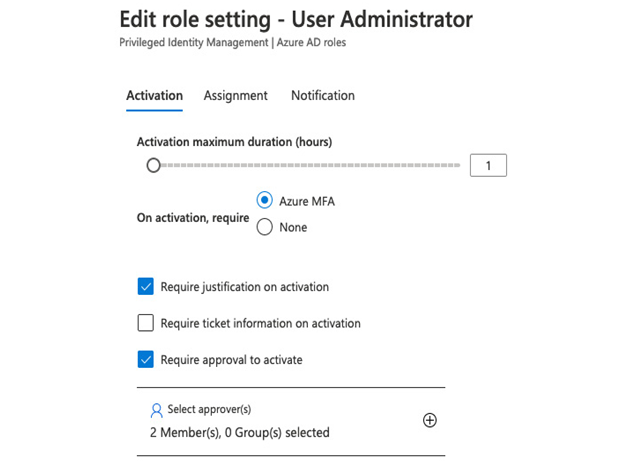
Figure 4.9 – Example activation settings
- Click Update.
- You will be taken back to the Role list; select the User administrator role again.
- From the horizontal menu, click Add assignment.
- Under Select members, click the No member selected link.
- In the Select a member box that appears, find and select the user you want to assign the role to and click Select
- Click Next.
- Under Assignment type ensure Eligible is selected.
- Optionally, untick Permanently eligible and set a date range such as 1 year to limit the period the user has the assignment.
- Click Assign.
- You will be taken back to the User administrator | Assignments window, click Eligible assignments on the horizontal menu, and confirm the user is now listed. See Figure 4.10, for example:
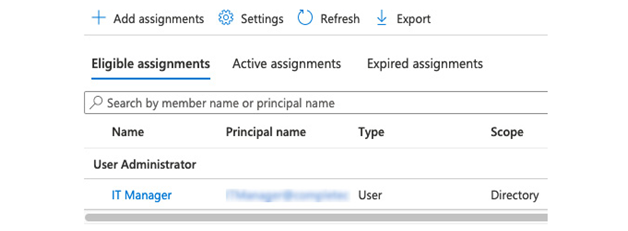
Figure 4.10 – PIM eligible users
Activating eligible roles
When a user wants to use an eligible role, they must first activate it. The options you set in the previous walk-through will determine whether or not the role is automatically activated on request or whether it needs to be approved. In our example, we set the requirement for an approver:
- In another browser, or in a private window, log in to the Azure portal by opening https://portal.azure.com as the assigned user.
- Search for then select Privileged Identity Management or PIM.
- From the left-hand menu, click Users.
- Select a user.
- Note that the options are grayed out. (Reset Password isn’t, but if you click it, you will receive an error.)
- In the resource search bar, search for PIM and select Privileged Identity Management.
- Click My Roles.
- Click Eligible assignments.
- Click Activate by the User Administrator role:
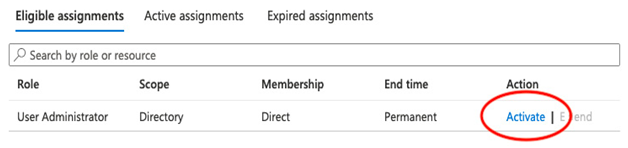
Figure 4.11 – Eligible assignments
- In the dialog that appears, enter a duration for the role activation and justification as in the following figure:
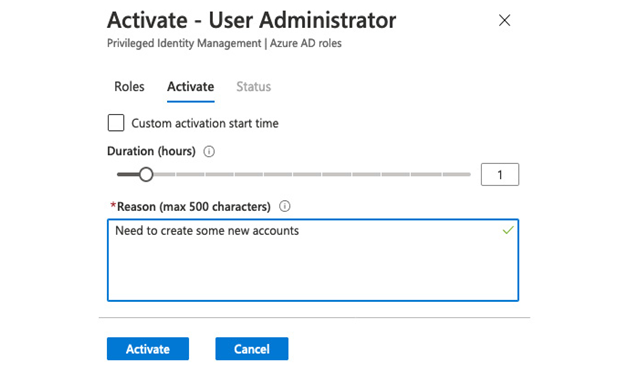
Figure 4.12 – Role activation request
- The request will now be sent to the approver.
Once a role has been requested, the approver will receive an email containing a link to approve or reject it. Alternatively, this can be performed in the portal, as we shall see next.