The traditional security model defines policies such as least privileged access, meaning you should always assign the least amount of rights to any one user. However, you still need to assign administrator rights to some users.
With PIM, you can control when and for how long those rights are granted. In other words, users have to request elevated access as they need it explicitly, and this access can then be time-boxed to be automatically removed after a defined period.
This way, even if an individual account were compromised, an attacker would still not have high levels of access.
Specifically, PIM can help you by doing the following:
- Providing just-in-time elevated access to Azure AD and resources
- Assigning accounts with time-boxed start and end dates/times
- Requiring an additional approval step for elevated access
- Enforcing MFA
- Requesting justification for why access is required
- You getting notified when privileged roles are granted
- Conducting Access Reviews
- Providing an audit history
A typical scenario might be as follows.
A manager needs to create a new guest account. By default, the manager does not have access to do this. Rather than grant the manager the role to do this, they are marked as eligible to have that role; they can then request access to complete the task, including why they need access.
The request can either be set to auto-approve or be directed to an authorizer for approval. The access is then granted but with only a 1-hour window. Once the window has expired, the elevated rights are automatically removed.
Activating PIM
To use PIM, you need a P2 license for every account that wishes to use the service – this includes users who need to manage/authorize others or accounts that need to be managed.
Important note
Example: If you have five accounts that will authorize access or perform access reviews, and you have five different accounts that will be managed or have access reviews run against them, you will need 10 P2 licenses.
Note that PIM can manage Azure roles and Azure AD roles, but not classic administrator roles – Account Administrator, Service Administrator, or Co-Administrators.
As PIM is very different from the traditional method of authorizing access to systems, simply “switching it on” is not a simple task. You need to activate and enforce its use gradually, but at the same time, ensure your systems are adequately secured as quickly as possible.
You must first activate PIM within Azure by searching for Privileged Access Management in the portal. The first account to use and set up PIM must be assigned as the Security Administrator and Privileged Role Administrator for your tenant.
Next, review all users who have elevated roles – that is, those who are one of the following:
- Global Administrator
- Privileged Role Administrator
- Exchange Administrator
- SharePoint Administrator
Ensure users with those roles do need it and remove any who don’t.
To help achieve this, you can use the Discovery and Insights tool:
- Navigate to the Azure portal by opening https://portal.azure.com.
- Select or search for Privileged Identity Management (or PIM).
- In the left-hand menu, select Azure AD roles.
- In the left-hand menu, select Discovery and Insights.
- For each of the discovered assignments, click the Reduce option, as shown in the following figure (Reduce global administrators).
- Remove the Administrator role from users who do not need it:
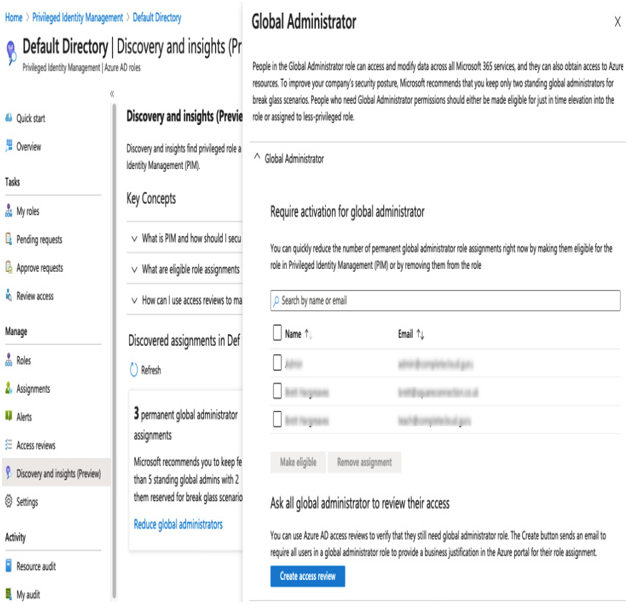
Figure 4.8 – PIM
Removing the roles can be achieved in several different ways. First, the assignment can simply be removed.
The second option is to make the role eligible; this means the user can have that role, but they have to request it first, which we will cover shortly.
Finally, to have the users confirm or deny whether they need the role, you can create an Access Review. Again, we shall cover this shortly.