When working with Azure policies and initiatives, the following best practice guidelines will help ensure a successful deployment:
- Start with an audit effect instead of a deny effect. Then, track the impact of your policy definition on resources.
- Consider organizational hierarchies when creating definitions and assignments.
- Create and assign initiative definitions, even for a single policy definition.
- When an initiative assignment is evaluated, all policies within the initiative are also evaluated. If you need to evaluate a policy individually, it’s better not to include it in an initiative.
As we have seen in this section, Azure policies and tagging help control what is deployed and ensure it is deployed in a compliant manner according to your company’s governance policies. However, there are some elements that you will always want to be deployed in a subscription. In the next section, we will examine Azure Blueprints and see how it provides an additional control layer.
Using Azure Blueprints
In the previous two sections, we looked at how to apply rules so that deployed resources meet the compliance rules as defined by the business. However, these constraints are on the resources themselves.
When new subscriptions are created within an Azure tenant, there will often be a set of components that always need to be in place. For example, every new subscription may need a VNet with a pre-defined set of network security group rules, a user-defined route table, a storage account to store encryption certificates, and so on.
One option would be to create a set of ARM templates within which all these items are defined and deploy them through a DevOps pipeline for each new subscription. The problem with this method is that once the components have been deployed, they can be modified. For some services, especially networking and security-related artifacts, this is not what we want.
Azure Blueprints allows us to define and deploy resource groups, resources, role assignments, and policy assignments automatically as a subscription is created. A key feature of Blueprints is that the connection between what is defined and what is deployed is kept. In other words, through Blueprints, you can check for and correct any configuration drift.
For more control, a resource lock can be set on the components to prevent users from modifying them, which is essential when setting default routing and firewalls.
In the following example, we will create a blueprint definition to enforce a VNet and then apply it to a subscription.
Creating a blueprint definition
Follow these steps to create a blueprint definition:
- Navigate to the Azure portal: https://portal.azure.com.
- In the top search bar, type Blueprints and select Blueprints under Services.
- On the left-hand menu, select Blueprint definitions.
- Click +Create blueprint.
- A list of sample and standard blueprints is listed, or you can create one from scratch. To make things easier, select Basic Networking (VNET).
- Give your blueprint a name such as CoreSystems and set Definition location to either a management group or a subscription.
- Click Next: Artifacts.
You will be presented with a list of resources that will be deployed along with this blueprint. If you click on one of the artifacts, you will then be shown an ARM template that will be used, as in the example shown in the following screenshot:
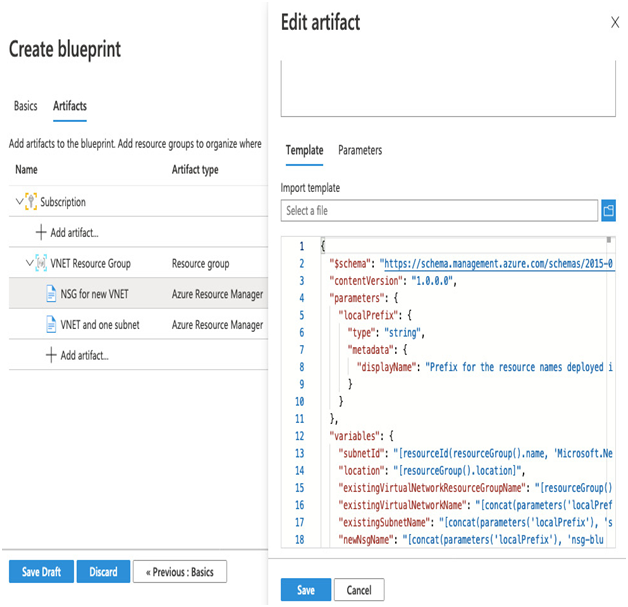
Figure 5.11 – Example blueprint
If you created and assigned the CostCenter tag policy, you will need to modify the resource group. See the following screenshot for an example:
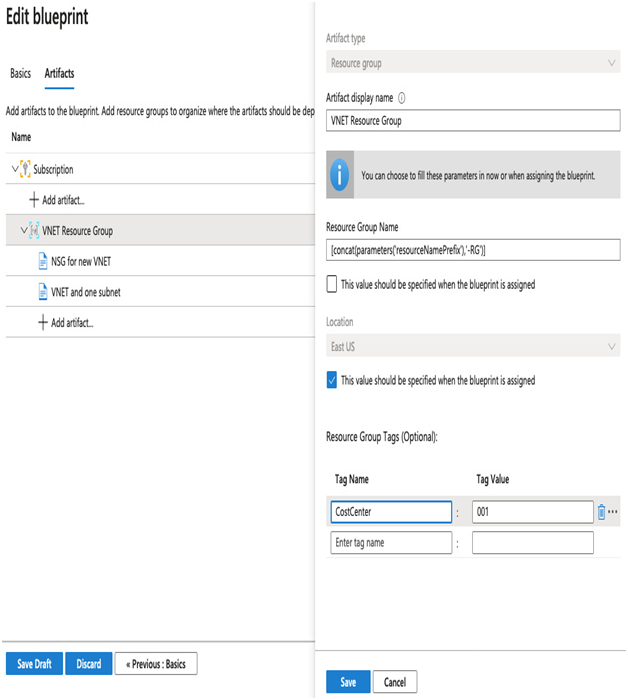
Figure 5.12 – Editing the resource group
- Click VNET Resource Group.
- Enter a tag name ofCostCenter and set the value to 001.
- Click Save.
- Click Save Draft.
Now that we have defined a blueprint, it will be in the draft state. Before we can assign it, we must publish the blueprint. When publishing a blueprint, you must set a version – this enables you to progressively update your blueprints as your platform matures; however, the versioning allows you to keep a history of your changes.